
To do image manipulation, background is a main element that can give your artwork more juicy. Now i show you how to create simple round radial effect just using filter in photoshop.
Step 1
Create new document. Name it 'radial'. i just use normal size 640 x 480
step 2
use contrast colors for foreground and background. Mine use yellow and red.
Then go to Filter > Sketch > Halftone pattern.
Step 3
I use default setting, and you can slide the bar until you get better result
Step 4
Here's the result. Simple is'nt it.
You can add your favourite graphics to make your final artwork more interesting.
Showing posts with label Photoshop Tutorial. Show all posts
Showing posts with label Photoshop Tutorial. Show all posts

Step 1
Open up yor photos, I use angelina Jolie as my photo. Then go to Photoshop's Save for Web command.
step 2
switch to the Eyedropper tool in the Save for Web's Toolbox,
step 3
Click on the background color you want to become transparent. i choose white with eyedropper tool
step 4
Then, just below the Color Table on the bottom right of the
dialog, click on the first icon, which creates transparency from your selected color , save the file and you're done.
Tags:
Step 1
To begin, lets choose your picture or you can choose whether its your boyfriend, hollywood celebrities or your lovely pet. I use brad pitt as my reference
step 2
choose filter > Blur > Smart Blur
Step 3
at 'mode' option, choose edge only
slide the bar until you satisfid with the result
Step 4
Your photos still in black background. You just need to choose Image > Adjustment and select inverse (mac shortcut : command + I )
Here's the final result. You can erased some messy lines with eraser tools .
Tags:
Today i want to show you how easy to turn your photos into sephia mode. This effect is suitable to make your photo look classic.
step 1
open up your photo..i use nature as my theme
step 2
click image > adjustment > hue and saturation
step 3
hue and saturation pop up will appear. Please tick 'colorize'
your photos become sephia instantly..drag the slides until you get better result and suit your taste..
that's all...:-)
photo copyright
www.nature-wallpaper.info
Tags:
I'll show you how easy to convert your pictures to a sepia tone images
step 1
open up your images. I choose my favourite miss world from korea mrs Honey lee. Pretty, isnt it?
step 2
convert your image mode to greyscale

click ok
Step 3
convert your image again back to RGB mode
Step 4
click Image, at Adjustment, choose Photo Filter
Step 5
Follow the setting below and choose color that you like
Finish:-)
hope this basic tutorial helps...
Tags:
Have you watched Transformers the movie recently? It's a cool movie, isn't it? I've watched it twice and looking forward to see it again. hehe.Here's the link to Photoshop users out there to create the Transformers logo.
Draw Transformers in Photoshop by hongkiat.com
cheers
Tags:

This tutorial will show you how to create some of the more popular Web 2.0 style button using Photoshop CS. Very nice tutorial.
link
http://www.hongkiat.com/blog/create-cool-glossy-button-for-web/
some glossy buttons that i have designed during my free time.
link
http://huzeyk.blogspot.com/2006/12/free-glossy-button.html
If you have a multi-layered document and want to turn each layer into its own separate document,
Click File menu, under Scripts, and choose Export Layers to Files.
walla!
Problem: The image looked great in Photoshop, but now that you've converted it to CMYK, saved the file as a TIFF, and placed it into QuarkXPress, InDesign, PageMaker, etc., the image looks awfulway oversaturated and totally whacked.
Reason: The preview of CMYK TIFFs just looks like that, so don't freak outif it looked right in Photoshop, it should print fine. Okay, what if you saved the file as an EPS, and when you place the image into your page layout app, the color of the image looks okay, but it's not crisp and clear, but pixelated.
Reason: By default, the preview embedded within EPS images is a lame 256-color preview.
Solution: In the EPS Options dialog, under Preview, choose JPEG. That way, it sends a 24-bit, full-color preview, rather than the lame 256-color preview.


Now that Photoshop CS can really give you type in a circle, getting a perfect circle that you can add type to is not as obvious as you'd think.
To get this perfect circle, click on the Shape tools in the Toolbox and choose the Ellipse tool from the flyout menu. Then go up to the Options Bar, and in the second group of icons from the left, click on the middle icon, which creates a regular path, rather than a Shape layer or a pixel-based shape.
Then, hold the Shift key, and drag out your circle (the Shift key constrains the shape to a perfect circle). Now you can move your Type tool over the circle, and it will change into a Type on a Path cursor. Click on the circle, and get to typing.

If you're using the Pen tool, and you've created multiple paths within your document, these paths are totally separate, and are moved independently of one another.
However, if you want these paths to move as one unitcombine them. Just switch to the Path Selection tool, then go up to the Options Bar and click on the Combine button.
Now when you move one path, all the combined paths move right along with it.
Hi! We meet again in this huzeyk Photoshop Tutorial. This time we'll be designing a magazine cover where the masthead is behind the main image on the cover of a magazine.
Examples:

STEP 1
Get an image of your favorite artist/singer/etc or you can download the image below. Here, I am using the photo of Malaysia's popular singer, Siti Nurhaliza. Open it using Photoshop.
Note: Click on the image to view its original size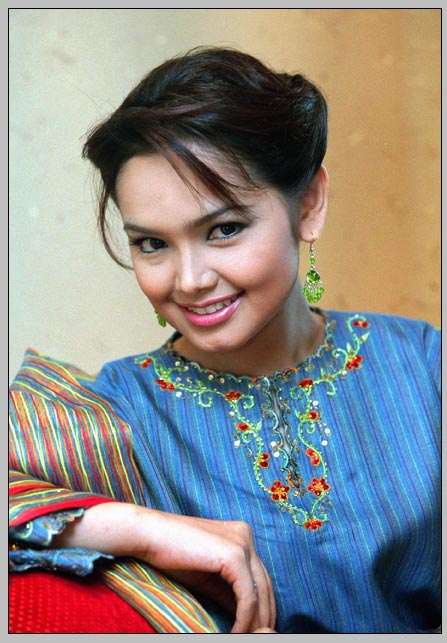
STEP 2
Then, type the name of your magazine. This will be the masthead. I'm naming this magazine as 'Trend'. Click Type Tool (Shortcut: T) and I use the setting below.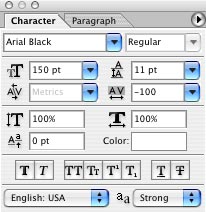
On layer 'Trend', click Layer Window > Layer Style > Blending Mode.
I use this setting for Stroke ....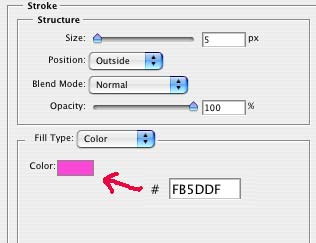
.... and this setting for Drop Shadow ....
.... and this is the result.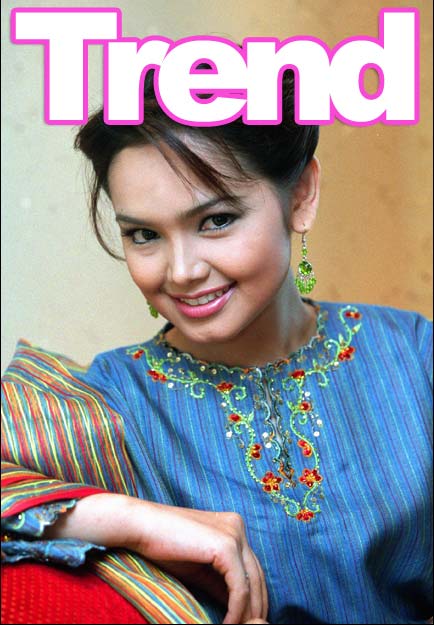
Now, here comes the important part of this tutorial, to move the masthead behind the image so that the image will stand out and to make it looks like the rest of the top magazines in the market.
STEP 3
Change the opacity of layer 'Trend' to 25-30% so it'll be easier for you to make path. Click on Pen Tool (Shortcut: P) and start tracing the path around the head near the masthead.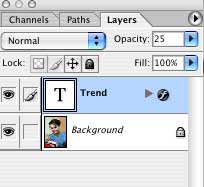

Then, go to Path Window and click on 'load path as selection'.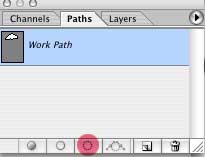
STEP 4
The path will change to normal selection area. Click on the background layer, copy and paste on a new layer. Make sure this layer is on top of the other layers and name it 'head 1'.
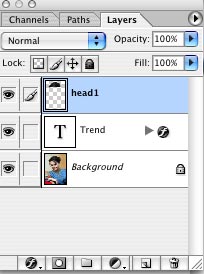
.... and this is the result.
STEP 5
Finally, add on the bar code, published date, volume number, price and titles of the main articles in the magazine to make it look like a real magazine.
download psd file
download here
Tags:


