
Hi, now I wanna share a technique of tracing in Adobe Photoshop. I would like stress on concentracing more on about lighting and shadow. If you understand these two concepts properly, undoubtly you will face no problem to start on tracing technique.

steps
1. First, get a photo and scan it by a big resolution, about 300-600dpi. For this picture, I use 600dpi. Save it in *.jpg format.
2. Open Adobe Photoshop(I am using version 7.0) and be ready to use common tools like Lasso, Eyedropper, and Brush. Set the Brush tool at normal mode with opacity 25%-45%. Use high resolution for the best quality, because this technique is a pixel-based art, unlike vector-based art like in Illustrator, Freehand, CorelDraw,etc. (I am using 150-300dpi). Save the file in *.psd mode.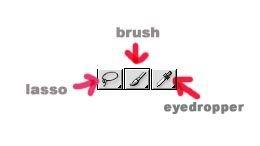
3. To begin, start at the face part. Select the face using lasso tool, as shown in the pic below.. Don't forget to create a layer and name it as 'muka', which means face.
4. Select the most basic skin color using the eyedropper,after the most suitable color is selected, click Fill>Foreground Color, and the output is as shown below.
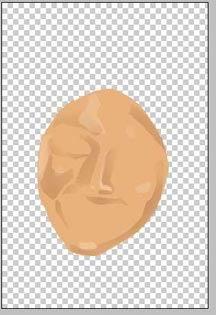
5. Hide the 'muka' layer. at Background layer, select the shadow part of the face(see pix).
tips: to create multiple lasso selection, press shift as you are selecting
6. Fill the selected part(shadow part) with a darker color. (a bit darker than the basic skin color). soft-click your mouse to produce light brush effect, and lighter color.(see pix).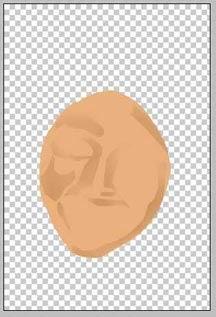
7. Hide again the 'muka' layer and choose the the light part of the face using lasso tool. Pick a lighter color than the basic skin color to create a lighting effect. Color softly to create a light brush effect(see pix)
8. Repeat step 5 to color mouth part, choose suitable color.
9. Select the dark part of the mouth and color it with darker color than the basic lip color.
10. Repeat step 7 to create lighting effect for the mouth.
11. to produce better effect, use as many layers as you can, so that each mistake can be corrected easily. For eyes part, repeat step 5 and color it by using basic eye color.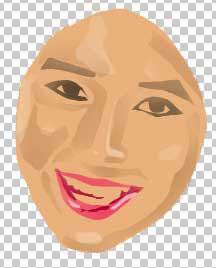
12. After repeating the steps(lighting and shadowing), the latest output can be seen in the pix below. For more interesting effect, try not too rigid in following the actual photo's color. this is because it will limit your quality and freedom of art. Try your best to choose your own logic color. Example of face color: brown, Lip: red, etc
13. Start to color the veil by creating a layer named 'tudung'. Repeat the steps in coloring the face. make sure the 'tudung' layer is under the 'muka' layer.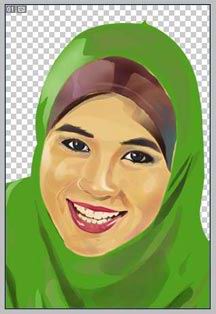
14. Finally, create a last layer named 'latar' for the background color. Choose your own desired color, either gradient or flat color.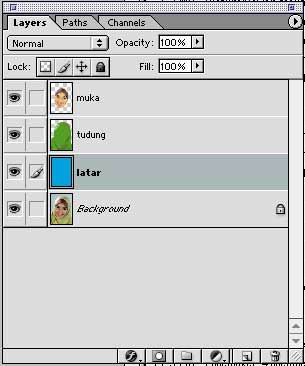

sample artworks
link 1
link 2
tutorial by : me http://huzeyk.blogspot.com
for more lasso artworks:http://www.huzeyk.com/portfolio.html
special thanks to-hairi-http://wanzu.net
translated by : wintersoltish
Related tutorial:
digital comic coloring - marvel style
easy way to color your comic in Illustrator
9 comments
Nice tutorial
Looks great! When i have the time i'll try that out. Just bookmarked your website so keep adding tutorials
What a useless tutorial. It would be useful, if they explained how to carry out the steps. Isn't tutorials meant to be helpful?
THanks for a great tutorial. I tried it myself and I loved my project. Thank you for sharing this with us.
Great tutorial! I am stuck on step 4. I cannot get the grey/white checkered background for placing the "face shape" that I got using the lasso tool. How do you get there? Thanks and keep up the good work.
Heath
OR-
Just go here:
http://vectormagic.stanford.edu/
The first hard step is using the lasso tool to follow around her face. Any suggestions to make that easier?
I can't figure out how to "lasso" her face properly. I guess I need a tutorial on the lasso tool first.
very nice tutorial there. is that waheeda?
http://www.cekikdarah.com
Post a Comment